Save Designs for
Giant Hoop-It-All(tm)


1 - Select the "Editor" mode.
2 - Click on "Hoop Size" button. (Picture No. 1).  

Picture No. 1


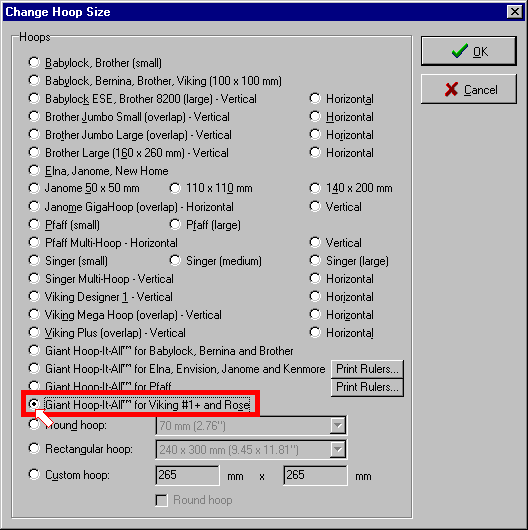
3 - Choose Giant Hoop-It-All(tm) for your sewing machine. (Picture No. 2).

Note: If you have not previously done so, verify the markings on your hoop to determine positions A, B, C, D, and E. For Pfaff and Janome machines, within Editor -> Options -> Hoop Size, click on the "Print Rulers" command next to the name of your hoop. This will print four rulers on your printer that you may glue on the rails of your GHIA. This provides the correct positioning marks for your machine. The GHIA for Viking and Brother machines have four lines for A, B, C, D positions drawn on the rails and the bottom of the rail is used to define the E position. 

 Picture No. 2


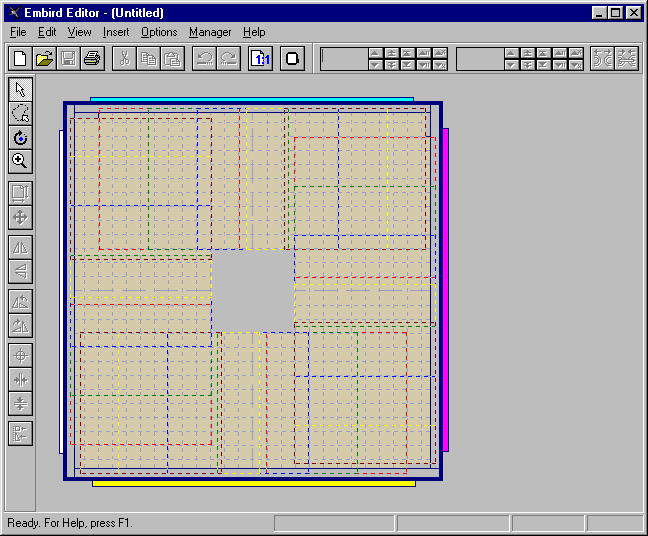
4 - The empty hoop will be drawn. (Picture No. 3).  

The center of hoop may be greyed out. If so, this area is non-usable with your sewing machine without re-hooping. Also, some area around the hoop perimeter and the corners is greyed out. This area is reserved for needle mechanism and/or is non-reachable.

You will see fuchsia, yellow, white and aqua lines around the hoop. These colors will be explained below. Also, there are all "child" hoops drawn, so that the working area looks very complicated. Child hoops are the maximum size that your sewing machine can sew in one position within the GHIA. You can switch on/off each side of hoop by Alt+Up, Alt+Down, Alt+Left or Alt+Right key combination (also accessible via "View -> Hoops In Giant Hoop-It-All" menu). You can turn them all on/off at once using Alt+Ins key combination.

All sides of hoop work like a magnet. If you turn some side off, it stops "attracting" designs unless you turn it on again. This way you can prepare designs side-after-side, starting with right side and ending with top side. All designs belonging to some side will be drawn in that side's color (i.e. fuchsia, yellow, white or aqua), but only when the side is off. This way you can check to which side does the particular object belong - turn all sides off (Alt+Ins) and you will see.

Picture No. 3


5 - Let's start with the right side of hoop. Turn all other sides off using commands in "View -> Hoops In Giant Hoop-It-All" menu. (Picture No. 4). 

Picture No. 4


6 - Merge the designs into hoop. Use "File -> Merge" command to merge a file. (Picture No. 5). For futher information on merging files, please see step 4 in Open Designs for Giant Hoop-It-All(tm) tutorial.

Picture No. 5


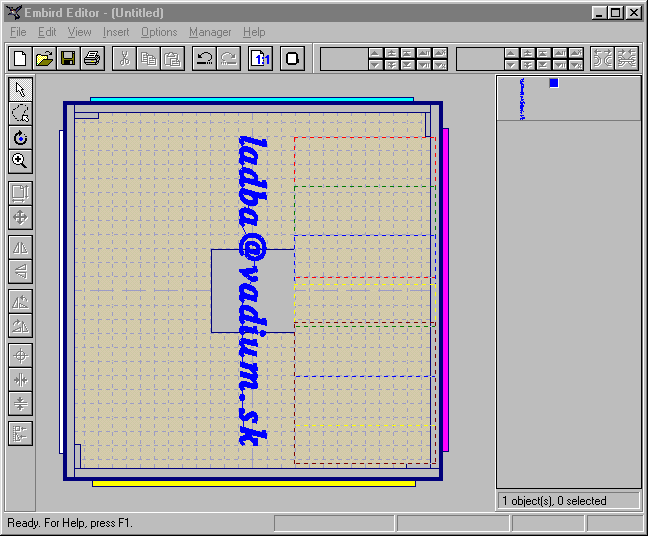
7 - Position the design at the right side of hoop. (Picture No. 6)

Picture No. 6


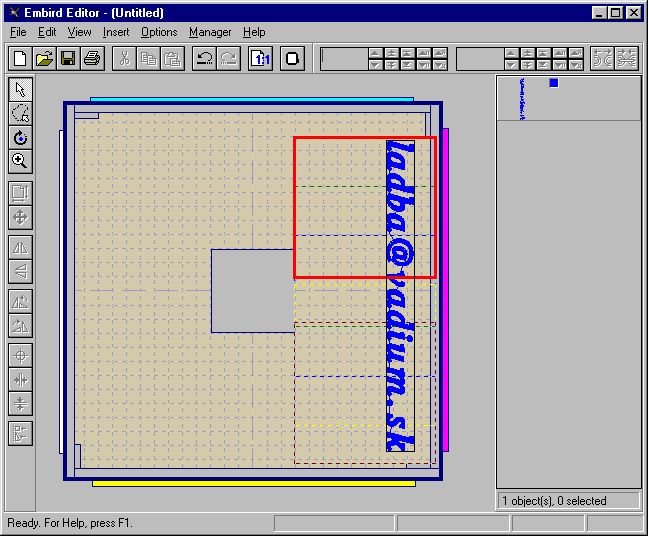
8 - You can see now, that the design exceeds size of child hoop and therefore it must be split.  (Picture No. 7).  More information regarding splitting is available in Interactive Free-Hand Splitting tutorial.

Picture No. 7


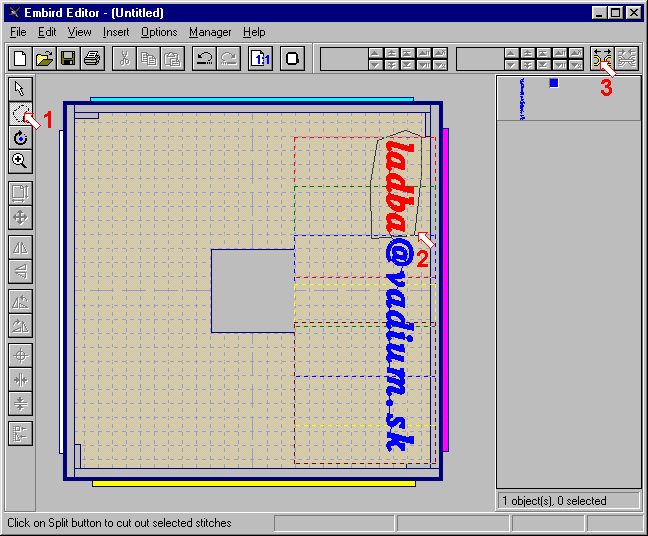
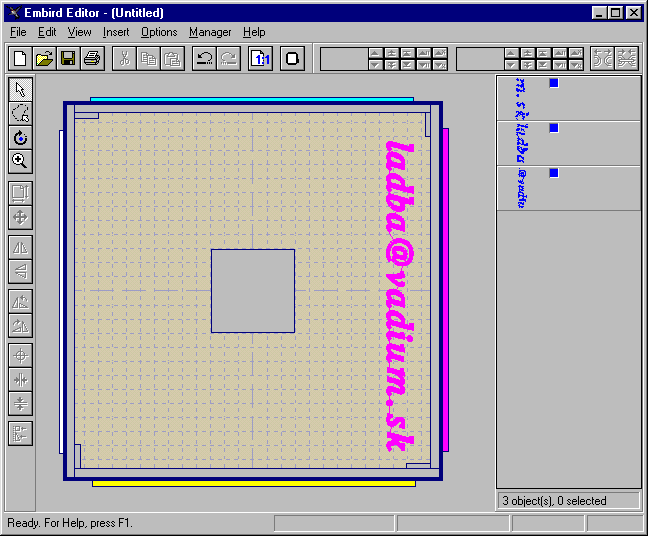
9 -  Repeat splitting process until every object fits into one of child hoops. (Picture No. 8). Sometimes it may be necessary to change the order of objects. Drag and drop objects at Objects Order Bar (right side of screen), so that their order is correct.

Picture No. 8


10 - When you are finished with splitting, turn off the right side of hoop (Alt+Right). All objects belonging to the right side should be drawn in fuchsia color now (Picture No. 9). If some objects are not drawn in this color, it means that they do not fit into child hoop and you must split them (press Alt+Right to turn on the right side and repeat step 8). Designs placed in the middle of the hoop (in grey non-usable area) cannot be saved and you must either delete them, or skip them during saving process.

Picture No. 9


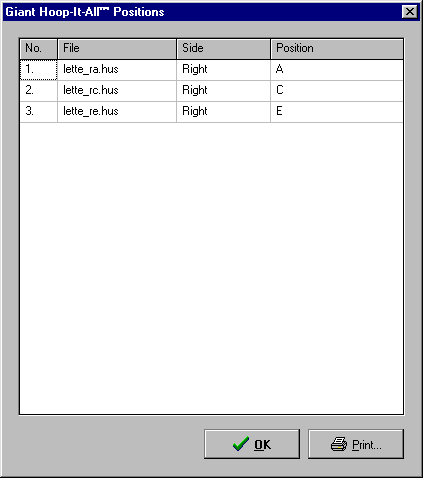
11 - Turn on the following side and repeat steps 6 to 10.
12 - When you are finished with all four sides, choose "File -> Save As..." command. Embird will save all parts to your disk now. The "Save As" box will first ask you for a filename, but only first 5 characters of this name will be used. The remaining characters will be used for indication of hoop position, e.g. lette_bc.hus means that the file is at Bottom side at Position C. This is very helpful during embroidering, or if you want to re-open these files in Editor. (Picture No. 10). 

Note 1 - Users of Viking and Babylock: Positions A, B, C, D correspond to lines marked on the rails of your Giant Hoop-It-All(tm). Position E is the bottom of the rail.

Note 2 - Users of Janome: Positions are defined in the following way: Attach the bracket to the sewing machine and then attach the sliding rail to the bottom of the bracket. Use the bottom of the bracket as a reference point. 
A: Slide the hoop into the bracket until the bottom of the bracket intersects the second screw hole from the top.
B: The hoop is pushed up until the bottom of the bracket is directly over the red horizontal line.
C: The hoop is pushed up until the bottom of the bracket intersects the third screw hole.
D: The hoop is pushed half way between screw holes #3 and #4. (The half way point between screw holes is 34mm.) 
E: The hoop is pushed up until the bottom of the bracket intersects the fourth screw hole.

You can print four rulers on your printer that you may glue on the rails of your GHIA. This provides the correct positioning marks for your machine. Use the "Print Rulers" command in Editor -> Options -> Hoop Size, next to the name of your hoop.

Note 3 - Users of Pfaff:  Positions are defined in the following way: Attach the bracket to the sewing machine and then attach the sliding rail to the bottom of the bracket. Use the bottom of the bracket as a reference point.
A: Slide the hoop into the bracket until the bottom of the bracket just covers the second screw hole from the top.
B: The hoop is pushed half way between screw holes #2 and #3. (This is 33 mm from bottom edge of upper screw hole.)
C: The hoop is pushed up until the bottom of the bracket just covers the third screw hole.
D: The hoop is pushed half way between screw holes #3 and #4. (This is 33 mm from bottom edge of upper screw hole.)
E: The hoop is pushed up until the bottom of the bracket just covers the fourth screw hole.

You can print four rulers on your printer that you may glue on the rails of your GHIA. This provides the correct positioning marks for your machine. Use the "Print Rulers" command in Editor -> Options -> Hoop Size, next to the name of your hoop.

Picture No. 10


Back to Embird Tutorial Contents